
📑 Table of Contents ▶
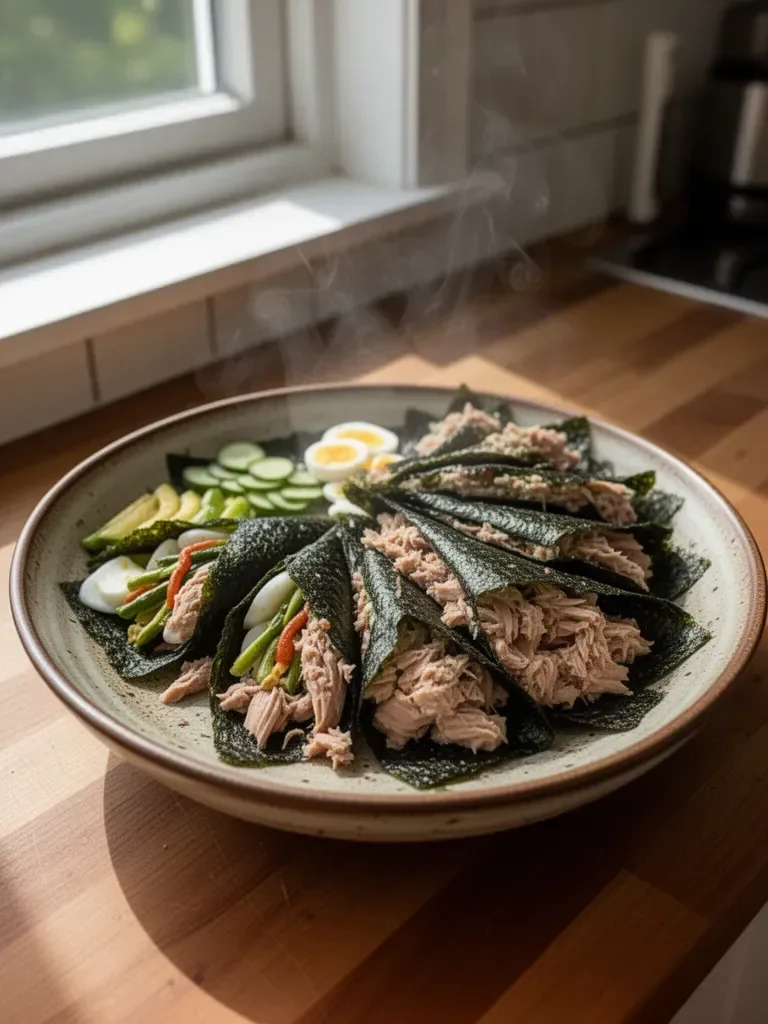
Nori Wraps with Canned Tuna
Crafting delicious meals doesn’t have to be complicated. Nori wraps with canned tuna represent the perfect blend of ease and taste. I remember the first time I prepared them; it was a busy weekday. I wanted something quick yet nutritious. After rummaging through my pantry, I spotted canned tuna, nori sheets, and fresh veggies. The harmonious combination of flavors and textures excites everyone who tries it.
As a health-conscious home cook, I found myself drawn to wraps as a meal option. They offer endless variations while being fun to make. Nori wraps packed with protein and fresh ingredients slide effortlessly into any meal plan. Plus, they make excellent snacks!
Making nori wraps with canned tuna doesn’t require extensive culinary skills. With a few ingredients and simple steps, you can create a delightful dish. This recipe not only satisfies hunger but gives you a nutritious boost. So let’s dive into the fundamentals of crafting these delicious wraps.
Nori Wraps with Canned Tuna
Fundamentals
Nori wraps stand out for their simplicity and health benefits. The nori sheets, seaweed-based, deliver an umami flavor that complements the canned tuna perfectly. Rich in essential nutrients like vitamins A, C, and E, nori offers more than just taste. Using canned tuna infuses the wraps with lean protein and healthy fats.
The fresh veggies add crunch and color, enriching the nutritional profile. They provide textures varying from crispy cucumbers to creamy avocado. This combination creates a delightful bite, ensuring no two mouthfuls are the same. You can enjoy these wraps any time of the day, whether for lunch, dinner, or a quick snack.
Preparation/setup
Preparing your work area is vital for a smooth wrap-making experience. Start by gathering all your ingredients: nori sheets, canned tuna, sliced cucumber, sliced avocado, julienned carrots, cream cheese (if desired), soy sauce, and sesame seeds for garnish. Having everything within arm’s reach simplifies the process.
Make sure to use a clean, flat surface for assembling. You can utilize a cutting board or a clean kitchen countertop. Lay down a nori sheet first, ensuring its shiny side faces downwards. This setup prepares you for adding layers of flavor, with the fresh ingredients providing a vibrant and colorful presentation.
Ingredients
- Nori sheets
- Canned tuna
- Cucumber, sliced
- Avocado, sliced
- Carrots, julienned
- Cream cheese (optional)
- Soy sauce (for dipping)
- Sesame seeds (for garnish)
Directions
- Lay a nori sheet on a clean surface.
- Spread a thin layer of cream cheese (if using) on the nori.
- Layer the canned tuna, cucumber, avocado, and carrots in the center of the nori.
- Gently roll the nori from one side to the other to form a wrap.
- Slice the wrap into bite-sized pieces.
- Serve with soy sauce and sprinkle with sesame seeds.
Creating Flavors with Nori Wraps
Technique
Rolling nori wraps takes a bit of practice, but you’ll get the hang of it quickly. The key lies in making sure to apply even pressure as you roll. Start at the edge closest to you and gently fold it over the fillings. Use your fingers to tuck the ingredients in while rolling, ensuring a snug wrap.
If you find that the nori tends to crack, it might help to lightly moisten the edges with a bit of water before folding. This creates a soft seal and prevents tearing. Moreover, practice makes perfect; the more you roll, the better you’ll become at creating those perfect, tight wraps.
Tips/tricks
To enhance your nori wraps, consider adding various spreads or sauces before layering. A touch of sriracha or wasabi can elevate the flavor profile, giving it a spicy kick. You can also experiment with different vegetables like bell peppers or radishes for a unique twist.
Prepare your nori sheets just before serving for optimal texture. If they sit too long after construction, they may lose their crispiness. Keeping the ingredients fresh and vibrant is key to making nori wraps appealing.
Perfecting Your Nori Wraps
Perfecting results
Achieving the perfect nori wrap relies on balancing flavors and textures. Adjust the proportions of each ingredient based on your preferences. For a creamier wrap, add more avocado or cream cheese. For extra crunch, load up on carrots and cucumbers.
Experimentation is part of the fun. Try varying the ingredients based on what’s in season or available in your pantry. The beauty of nori wraps lies in their versatility; feel free to customize them to suit your taste.
Troubleshooting/variations
If you encounter challenges with your nori wraps, don’t worry. If the wraps are too dry, consider adding a little more cream cheese or soy sauce for moisture. If your wraps fall apart when cutting, ensure you’re not overstuffing them. A smaller amount of filling can create a neater wrap.
For those looking to switch it up, consider incorporating cooked protein such as shrimp or grilled chicken. You can also swap canned tuna for other seafood or even plant-based proteins for a vegetarian version.
Serving and Storing Your Nori Wraps
Serving/presentation
Presentation plays an essential role when serving nori wraps. Slice the wraps into bite-sized pieces for easy handling. Arrange them on a colorful serving plate and garnish with sesame seeds for added flair. A small bowl of soy sauce on the side provides a perfect dipping sauce.
You can also serve these wraps as part of a larger meal. Pair them with a fresh salad or a light soup for a complete dining experience. Their vibrant colors and fun presentation make them a hit at casual gatherings and family meals alike.
Pairings/storage
Nori wraps pair beautifully with fresh flavors. Consider serving them alongside pickled ginger or even a light salad. For storage, wrap leftovers tightly in plastic wrap to maintain freshness. Enjoying them within a day retains optimal quality.
Refrigeration can help keep your ingredients fresh, but consume the wraps within 24 hours for the best taste and texture. As always, adjust ingredient quantities based on your needs to minimize waste.
Conclusion
Crafting nori wraps with canned tuna quickly builds culinary skills while delivering exceptional flavor. The process combines wholesome ingredients into a delightful dish. As you gather your nori sheets and other essentials, remember that these wraps offer room for creativity. Embrace the versatility of nori wraps, adapting them to suit your tastes as you explore a world of ingredients. Enjoy the journey of creating and savoring these nutrition-packed delights!
Print
Nori Wraps with Canned Tuna
- Prep Time: 10 minutes
- Cook Time: 0 minutes
- Total Time: 10 minutes
- Yield: 2 servings
- Category: Snack
- Method: Rolling
- Cuisine: Japanese
- Diet: Pescatarian
Description
Delicious and nutritious nori wraps filled with canned tuna and fresh vegetables, easy to make and perfect for any meal.
Ingredients
- Nori sheets
- Canned tuna
- Cucumber, sliced
- Avocado, sliced
- Carrots, julienned
- Cream cheese (optional)
- Soy sauce (for dipping)
- Sesame seeds (for garnish)
Instructions
- Lay a nori sheet on a clean surface.
- Spread a thin layer of cream cheese (if using) on the nori.
- Layer the canned tuna, cucumber, avocado, and carrots in the center of the nori.
- Gently roll the nori from one side to the other to form a wrap.
- Slice the wrap into bite-sized pieces.
- Serve with soy sauce and sprinkle with sesame seeds.
Notes
To enhance flavor, consider adding sriracha or wasabi. Fresh ingredients should be used for best results.