
📑 Table of Contents ▶
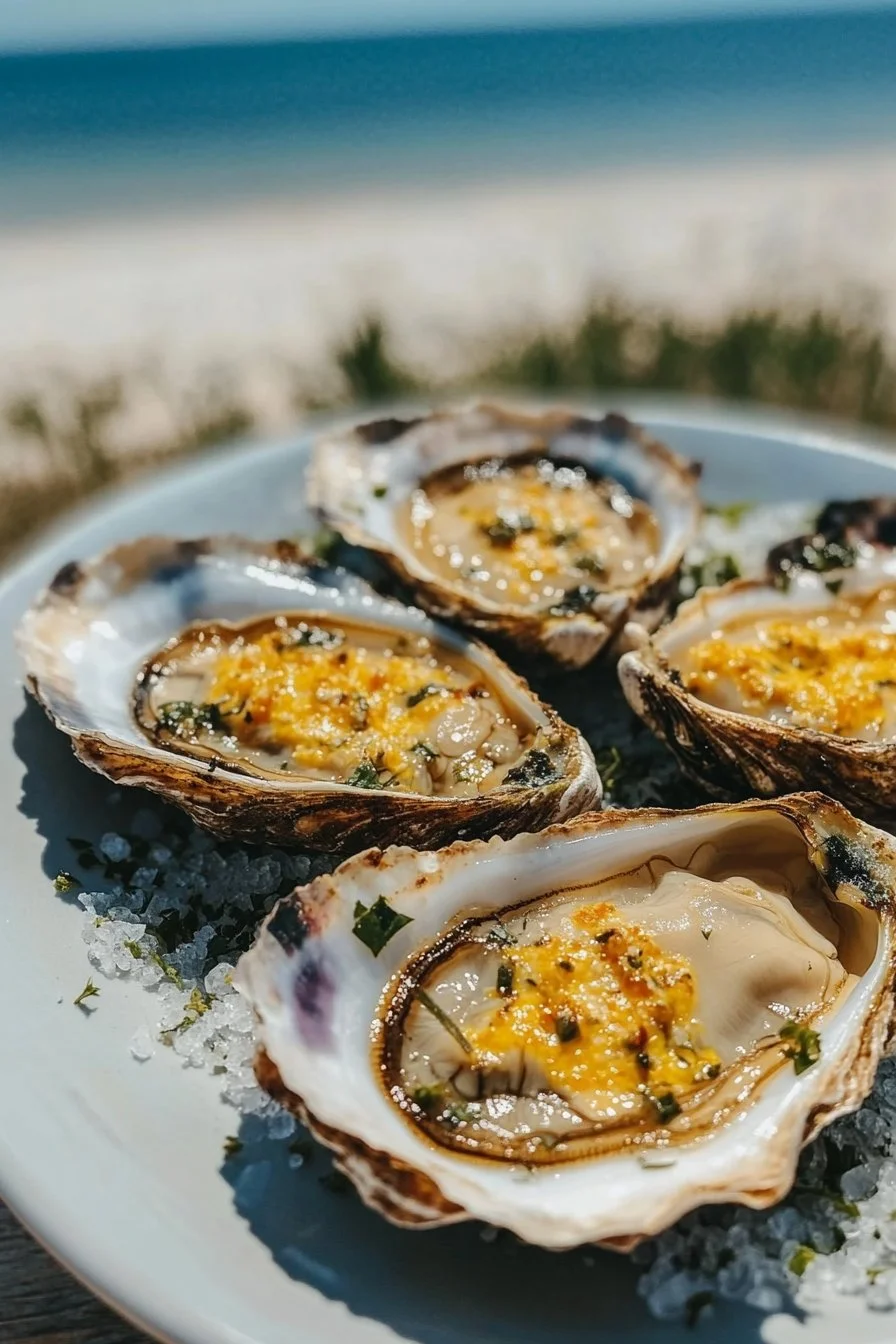
Chargrilled Oysters
Exploring the ocean’s bounty has always intrigued me. Chargrilled oysters offer that delight by bringing vibrant flavors to the forefront while being an accessible dish for gatherings. I fondly recall summer barbecues where friends and family gathered around the grill, enjoying lively conversations and succulent dishes. Chargrilled oysters became a staple, showcasing how simple ingredients can make a stunning impact.
Preparing chargrilled oysters provides more than just a meal; it creates an experience. The excitement of shucking oysters and the aroma of garlic butter sizzling on the grill fills the air with anticipation. Each bite bursts with freshness and flavor, making it hard to resist just one more. These oysters are not only tasty but also embody a sense of community, perfectly blending togetherness with culinary artistry.
Whether you’re familiar with grilling or just diving into this culinary adventure, chargrilled oysters promise to be a rewarding endeavor. Unleash the deliciousness with fresh oysters, a delightful garlic-butter sauce, and the smoky essence of the grill.
Part 1 — Chargrilled Oysters
Fundamentals
Chargrilled oysters bring a unique twist to traditional oyster dishes. Grilling enhances their natural flavors while adding a delicious smokiness. It’s essential to start with fresh oysters, which serve as the foundation for this delectable dish. The chargrilling technique ensures that each oyster retains its juicy characteristics while infusing them with the savory garlic-butter sauce.
Using the right grilling method makes all the difference. When you grill oysters, they reveal their briny sweetness, making each bite a true delight. The combination of melted butter, garlic, and spices complements the oysters perfectly. This dish showcases how simple ingredients, when treated with care, can elevate a meal into something extraordinary.
Preparation/setup
Preparation is key to achieving the best chargrilled oysters. Begin by preheating your grill to medium heat, aiming for around 350°F (180°C). This temperature ensures the oysters cook evenly without drying out. Meanwhile, clean them thoroughly under cold water to remove any dirt or debris, ensuring they are safe and ready for grilling.
Next, shuck the oysters with careful precision. Keeping them in half of their shell allows for easy grilling and serving. Once shucked, the oysters await a flavorful sauce that will enhance their taste. In a bowl, combine melted butter, minced garlic, and a few other essential ingredients. Mixing them well will create a sauce that beautifully complements the brininess of the oysters.
Ingredients
Gathering quality ingredients can significantly impact the outcome of your chargrilled oysters. Here’s what you’ll need:
- 12 fresh oysters
- 4 tablespoons unsalted butter, melted
- 2 cloves garlic, minced
- 1 tablespoon lemon juice
- 1 teaspoon Worcestershire sauce
- 1 teaspoon hot sauce (optional)
- 2 tablespoons fresh parsley, chopped
- ¼ teaspoon salt
- ¼ teaspoon black pepper
- Grated Parmesan cheese (for topping)
These ingredients come together to create the perfect balance of flavors while celebrating the oysters’ natural taste.
Directions
- Preheat your grill to medium heat, around 350°F (180°C).
- Clean the oysters: Rinse under cold water to remove any dirt or debris. Scrub gently if needed.
- Prepare the sauce: In a bowl, combine melted butter, minced garlic, lemon juice, Worcestershire sauce, hot sauce (if using), chopped parsley, salt, and black pepper. Mix well.
- Open the oysters: Carefully shuck the oysters, keeping them in half of their shell for grilling. Discard the other half.
- Place oysters on the grill: Arrange them on the grill grate or a grill-safe pan.
- Add the sauce: Spoon the prepared sauce over each oyster.
- Grill the oysters: Close the grill lid and cook for about 10-15 minutes, or until the oysters begin to curl at the edges and are fully cooked.
- Add cheese: In the last few minutes of grilling, sprinkle grated Parmesan cheese over the oysters if using.
- Remove from grill: Carefully take the oysters off and let them cool for a minute.
- Serve and enjoy: Serve immediately, garnished with additional parsley and lemon wedges if desired.
Part 2 — Grilling Technique
Technique
Grilling oysters requires a few techniques to achieve the desired results. Begin by ensuring your grill is hot enough before placing the oysters on it. This step prevents them from overcooking, resulting in a tender and juicy texture. As the oysters heat up, the shell will slightly open, indicating they are cooking properly.
Maintaining even heat is crucial for effective chargrilling. If some oysters are cooking faster than others, rotate them occasionally to ensure uniform cooking. This technique guarantees that no oyster goes undercooked or overdone, creating a consistently delectable experience for everyone.
Tips/tricks
A few useful tips can make your chargrilled oysters turn out perfectly every time. Firstly, avoid overcrowding the grill. When oysters receive adequate space, they can cook evenly and grill to perfection.
Another invaluable trick is to prep your sauce ahead of time. This method saves time and allows for seamless assembly when grilling. Additionally, keep a close eye on the grilling process. They only need a short time to cook, so monitoring them ensures their texture remains just right.
Part 3 — Perfecting Results
Perfecting results
To perfect your chargrilled oysters, focus on timing. The optimal cooking time usually falls between 10-15 minutes, allowing for both cooking and that delightful caramelization of garlic and butter. When you notice the edges of the oysters begin to curl, that serves as your cue that they are ready.
Adjusting the heat can also refine the grilling results. If you find that the oysters are cooking too quickly or not enough, either raise or lower the temperature accordingly. This ensures you achieve consistently beautifully grilled oysters.
Troubleshooting/variations
Occasionally, issues may arise during the grilling experience. If your oysters do not open on the grill, they may require additional time. Covering the grill helps maintain heat, allowing the oysters to cook thoroughly until they open.
In terms of variations, experimenting with toppings can yield unique flavors. Consider adding fresh herbs or even a squeeze of lime for a different twist. The basic recipe serves as a foundation, so feel free to modify it based on your preferences.
Part 4 — Serving and Presentation
Serving/presentation
Serving chargrilled oysters provides an opportunity for creativity. Arrange the grilled oysters on a platter, garnished with fresh parsley and lemon wedges. This visually appealing presentation enhances the eating experience, making them even more enticing.
To elevate the dish further, consider serving with a side of homemade bread or crackers, allowing your guests to fully enjoy the delicious garlic-butter sauce. Remember, the visual aspect is just as important as the taste, so take time to create an inviting presentation.
Pairings/storage
Chargrilled oysters pair wonderfully with a variety of sides. Fresh salads, vegetable skewers, or even a light pasta can make delightful companions. As for leftover oysters, proper storage is key. Allow them to cool, then place them in an airtight container in the refrigerator to preserve their quality for the next day.
Consuming leftovers within a day or two ensures optimal freshness. When reheating, do so gently to maintain their texture and flavor.
Chargrilled oysters stand out as a flavorful dish that can enhance any gathering. With the right approach, they become an extraordinary focal point of any meal. Embrace the thrill of grilling and dive into those beautiful flavors each time you prepare chargrilled oysters.
Print
Chargrilled Oysters
- Prep Time: 15 minutes
- Cook Time: 15 minutes
- Total Time: 30 minutes
- Yield: 4 servings
- Category: Appetizer
- Method: Grilling
- Cuisine: Seafood
- Diet: Gluten-Free
Description
Chargrilled oysters bring vibrant flavors and a smoky twist, creating a delightful dish perfect for gatherings.
Ingredients
- 12 fresh oysters
- 4 tablespoons unsalted butter, melted
- 2 cloves garlic, minced
- 1 tablespoon lemon juice
- 1 teaspoon Worcestershire sauce
- 1 teaspoon hot sauce (optional)
- 2 tablespoons fresh parsley, chopped
- ¼ teaspoon salt
- ¼ teaspoon black pepper
- Grated Parmesan cheese (for topping)
Instructions
- Preheat your grill to medium heat, around 350°F (180°C).
- Clean the oysters: Rinse under cold water to remove any dirt or debris.
- Prepare the sauce: In a bowl, combine melted butter, minced garlic, lemon juice, Worcestershire sauce, hot sauce (if using), chopped parsley, salt, and black pepper. Mix well.
- Open the oysters: Carefully shuck the oysters, keeping them in half of their shell for grilling.
- Place oysters on the grill: Arrange them on the grill grate or a grill-safe pan.
- Add the sauce: Spoon the prepared sauce over each oyster.
- Grill the oysters: Close the grill lid and cook for about 10-15 minutes, or until the oysters begin to curl at the edges.
- Add cheese: In the last few minutes of grilling, sprinkle grated Parmesan cheese over the oysters if using.
- Remove from grill: Carefully take the oysters off and let them cool for a minute.
- Serve immediately, garnished with additional parsley and lemon wedges if desired.
Notes
Keep an eye on the grilling process to ensure the oysters cook perfectly. Serve with homemade bread or crackers for an elevated experience.